UTMStack Master Installation Guide for Azure
This guide will walk you through the step-by-step process of installing UTMStack Master on Azure. Please follow the instructions carefully to ensure a successful installation.
Prerequisites
Before you begin the installation, make sure you have the following prerequisites:
- An active Azure subscription.
- Basic knowledge of Azure and virtual machines.
- Access to the Azure portal.
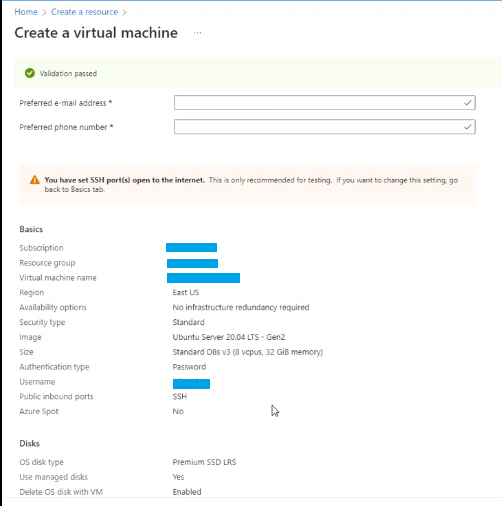
Step 1: Create a Virtual Machine
- Sign in to the Azure portal at portal.azure.com using your Azure credentials.
- Click on “Create a resource” and search for “Ubuntu Server” in the Azure Marketplace.
- Select “Ubuntu Server” from the search results and click “Create.”
- Fill in the required information for the virtual machine, such as the resource group, virtual machine name, region, and availability options.
-
Choose the appropriate virtual machine size based on your resource requirements. See System Requirements page to select the better option.
-
Configure the networking options, such as virtual network and subnet settings, public IP address, and SSH settings (ensure that port 22/TCP is open for SSH access from your IP).
-
You will need port 80/TCP and 443/TCP open to access the UTMStack web interface.
-
Review the configuration details and click “Create” to start the virtual machine deployment process.
Step 2: Expand the System Disk
Note: This step should be performed after the virtual machine creation is complete.
- Locate the newly created virtual machine in the Azure portal.
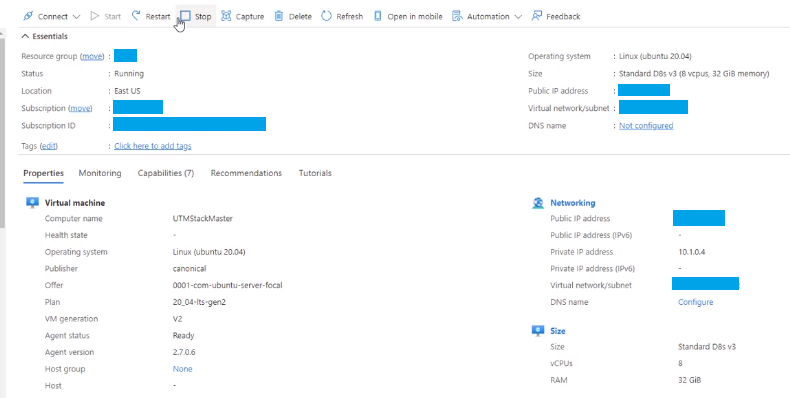
- Stop the virtual machine to enable disk expansion.
- Go to the “Disks” section of the virtual machine settings.
-
Select the system disk and click on “Size + performance” to expand the disk size.
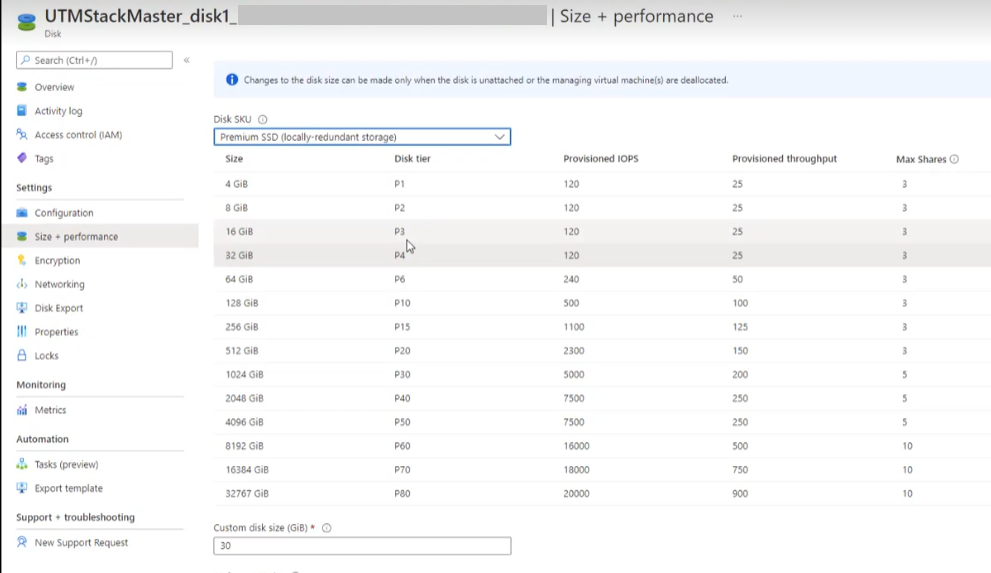
- Choose the desired disk size, such as 256GB, and apply the changes.
- Start the virtual machine after the disk expansion process is completed.
Step 3: Access the Virtual Machine
- Once the virtual machine is running, note down the public IP address or DNS name assigned to it.
- Open an SSH client, and connect to the virtual machine using the public IP address or DNS name.
- Provide your Azure credentials and SSH into the virtual machine.
Step 4: Install UTMStack
- Inside the SSH session, follow the official UTMStack installation guide for Ubuntu to install UTMStack Master. You can find the installation guide at UTMStack Installation Guide.
- Make sure to carefully follow the instructions provided in the guide, including the configuration settings and any additional dependencies or packages required.
- Complete the installation process as per the guide’s instructions.
Step 5: Post-Installation Configuration
- After the UTMStack Master installation is complete, you can access the UTMStack web interface by opening a web browser and navigating to the IP address or DNS name of the virtual machine, followed by the appropriate port (usually port 443 for HTTPS).
- Follow any further configuration steps provided in the UTMStack documentation to set up the system according to your requirements.
Congratulations! You have successfully installed UTMStack Master on Azure. You can now begin utilizing the UTMStack platform for your network management and monitoring needs.